The Facebook Pixel: How To Get Started
3 min to read ✭ In this post, you'll learn about the benefits of the Facebook Pixel and how to implement it on your website using Google Tag Manager.
Understanding the Facebook Pixel
The Facebook pixel is an analytics tool that allows advertisers to track actions taken on their ads. There are many benefits to utilizing the Facebook pixel, from retargeting capabilities to understanding audience behavior on your website, making it a key factor in any campaign.
Benefits of the Facebook Pixel
Implementing the Facebook Pageview pixel on your website provides you with the ability to understand customer behavior by tracking when people visit your website and allowing you to see how many landing page views were brought by your ads.
Tracking your landing page views gives you the ability to make sure your ads are being shown to the right people. The pixel starts gathering data right away, so the sooner you place it the better! Facebook is then able to find people who have visited specific pages on your website and also allows you to create specific audiences to retarget them in future campaigns.
Once you have the Pageview pixel on your website, you have the ability to create Standard Events and Custom Events based on your goals. We will go into more detail on how to set that up in a future post, but you can use Pixel Events to define actions that users take on your website. These specific actions can include Event Registrations, Donations, Newsletter sign ups, and more!
Understanding what happens when people see your ads provides you with the ability to better optimize your campaigns and receive measurable results. Without the pixel, you won’t be able to optimize for any events (such as Donations, Purchases, Leads) and your success will be limited.
Next, learn how to place the Facebook Pixel using Google Tag Manager. If you don’t have Google Tag Manager, you’ll want to set up and install it on your website.
Placing the Pageview Pixel Using Google Tag Manager (GTM)
Before you can create and track standard events through Facebook, you’ll need to place the Pixel base code using Google Tag Manager (GTM). Follow these steps to place the Pixel on your website:
Step 1: Install Google Tag Manager
Make sure GTM is on your website. You’ll want to ensure that the GTM that is installed on your website is the same as the container you will be working out of in Google Tag Manager.
Step 2: Log In
Log in to your Google Tag Manager account.
Step 3: Select the Container
Select the GTM container for your website and make sure the container ID matches the one on your website. Click New Tag.
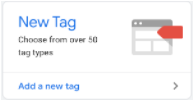
Step 4: Name Your Tag
Name your tag and click on Tag Configuration. Select Custom HTML.
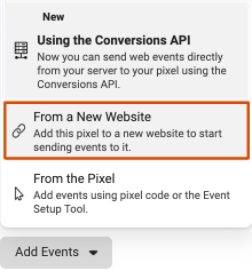
Step 5: Add Your Events
Go to Events Manager and select Add Events and select From a New Website.
Step 6: Copy the Pixel Code
Select “Install Code Manually” and press Copy Code to add the entire pixel code to your clipboard.
Step 7: Add Your Pixel Code
Go back to GTM and paste the pixel code in the HTML box.
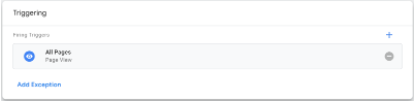
Step 8: Select the Trigger
Click on Triggering and select All Pages.
Step 9: Save Your Changes
Press Save and press Submit and then Publish your changes.
Step 10: Check Your Work
Visit your website and use the Facebook Pixel Helper (Google Chrome Extension) to confirm that the Pageview Pixel fires correctly.